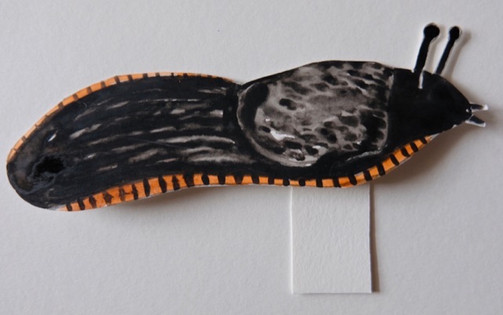
This fun slug watercolour painting is an interactive piece of artwork. Move the slug and watch the slime appear. Land snails and slugs both produce mucus, as does every other kind of gastropod, from marine, freshwater, and terrestrial habitats.
Due to their slimy manner, the slug is often looked at as a disgusting garden pest but there is more to it than eating your veggies and being slimy. They help to remove dead and decaying plant matter from natural environments and are part of a larger ecosystem.
Wildlife like certain beetles, songbirds, frogs and hedgehogs all eat slugs. In fact, we need both snails and slugs to have a balanced ecosystem and without them birds like the thrush that depend on them may not be able to thrive. By tolerating and even appreciating these slimy creatures, like by removing them out of your garden safely to another location instead of killing them, we can help keep the ecosystem balanced.
Learn more about slugs while creating this craft. You can research slug anatomy on your own or use our free slug anatomy printables to learn and label the parts of a slug. The slug printables were designed with help by Charlotte age 6, we hope your kids will enjoy them!
We also made a free Printable slugs template to cut and colour and make into your moveable slug, or you can use it as a reference when drawing your own.

We hope you enjoy this blog post, with our step by step visual guide to help you make this fun interactive slug craft.

This black slug we saw on a forest walk inspired this craft! Never touch a slug, you could accidentally hurt it or it may carry diseases. If you need to remove it from a garden use gloves or carefully pick it up with a small shovel.


We hope this craft inspires you to think differently about slugs and that you will love them for their unique characteristics.

Materials:
Watercolour paper
Watercolour paints
Paint brushes
Mod podge glue or clear glue
Jar of water for painting
Scissors
Free slug printable, if desired

Instruction:
PAINT A BACKGROUND layout for the slug using watercolour paints onto watercolour paper. Any size will work. We used 8 1/2 inches by 11 inches and created it in landscape.
Create a garden or forest scene of your choice. If you want to make it extra fancy cut four strips of the watercolour paper an inch wide, and glue them onto each side to add a frame, then paint the frame with the painting!

Now DRAW A SLUG with a pencil onto a separate piece of watercolour paper, then paint the slug using watercolour paints, make it look however you’d like! Once it’s dry cut it out and set it aside.

Use our free slug printable if you want! Colour the printout with crayons, pastels or makers then glue it onto cardboard or watercolour paper so that it’s on thicker paper and cut the slug out. Weigh it down with a heavy book for a day, if it curls from the glue. If you are able to print the template directly onto watercolour paper then you can paint it with watercolour paper and cut it out.

Print the free printables directly from this blog, or download it from our printables section on our website under the main header.
We also have free SLUG ANATOMY printables for learning purposes:
Now that you have completed the artwork, it is time to add the backing holder piece to the slug to make it moveable;

Directions:
1. Cut a strip of watercolour paper about an inch wide and 8 inches long
2. Fold one end half an inch.
3. Turn over the paper strip and fold the same end again.
4. Put glue between the second and third fold (see image).
5. Fold the longer part once more back the other way, so that the entire piece creates a T shape. The long part is like a handle to pull the slug and the shorter part will be glued to the slug. If you need to cut the long part shorter, do that now.
6. Glue the folded end to the slug.

Now it’s time to finish off the final touches!
Add a slit in your watercolour layout, from about the middle to the far right end of the paper. Don’t cut all the way to the edge. Use sharp scissors or an exacto knife (adult help may be required for this step, supervision is needed).

ADD THE SLUG SLIME! Add clear glue to the middle and left side to create the slime of the slug. We used a thick coat of Mod Podge.

Add a few layers of the clear glue, if needed!

Allow it to dry before placing the slug on.


Place the slug holder through the slit, and fold it downward. That way it can sit flat when not in use. If you found any parts of the slug or the painted paper isn’t as flat as you’d like, weigh it down with a heavy book for a day or two!


Play with it and put on a little picture story!

We hope you enjoy learning about slugs and find them as interesting as we do!

If you create this and want to show us, tag us on Instagram @acorns.and.aprons or email is at acornsamdaproms@gmail.com. We may end up sharing your creations to our ig stories,


Comments